I spent some time this weekend practicing my photography techniques for the upcoming solar eclipse. One of the main things I wanted to practice was how my Nikon D750 handles bracketing and exactly how the process works. I also worked on my focusing so when the day comes I’ll can get the sun in focus quickly.
First off what is bracketing in photography? Here’s the definition according to Wikipedia.
Bracketing is the general technique of taking several shots of the same subject using different camera settings. Bracketing is useful and often recommended in situations that make it difficult to obtain a satisfactory image with a single shot, especially when a small variation in exposure parameters has a comparatively large effect on the resulting image. Autobracketing is automatic bracketing by using a setting on the camera to take several bracketed shots (in contrast to the photographer altering the settings by hand between each shot).
During the totality phase of the upcoming total solar eclipse you’ll need to bracket the exposures of the eclipse to capture details during totality such as suns corona. This is called exposure bracketing and its a very common form of bracketing in photography. During the total eclipse the amount of light coming from the sun will drop off dramatically. Some experts estimate the drop off may be up to 12 stops on a camera. So if you want to capture the details of the corona you’ll need exposures at different shutter speeds to effectively capture it.
I plan on doing manual bracketing and auto bracketing on my camera during the event. Most DSLR cameras today come with some form of autobracketing. Check your cameras instruction manual for details on how autobracketing works with your camera. On my camera, the Nikon D750, I can set autobracketing to take up to 9 photos if my stops are set to 1. I’ll likely use autobracketing on my camera when totality starts to capture my initial series of bracketed total eclipse photos. I’ll start at a shutter speed of 1/1000 of a second and let the program run. Once that is complete I’ll do a series of manual bracketed photos, manually setting the exposure time and taking the photos using my remote control so I don’t introduce shake into the image. During the manual phase I’ll start at 1/1000 again and this time go all the way up to 8 seconds.
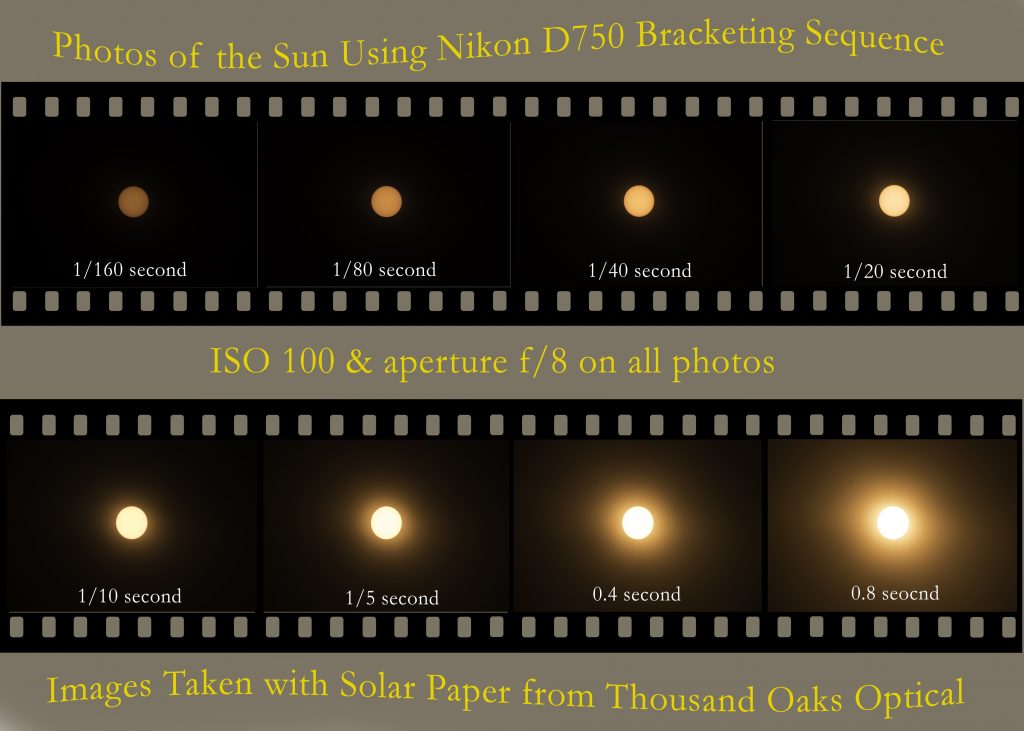
It’s very important to practice your manual and autobracketing exposure techniques in the days and weeks before the eclipse. Totality only lasts for a little more than 2 minutes so you don’t have much time to take your photos and at the same time enjoy this rare event. Don’t get so caught up in taking photos that you miss the eclipse. I took advantage of sunny skies this weekend to work with the autobracketing function on my Nikon camera. So during my practice session I did the 9 shot bracketing sequence of the sun at 1 stop of exposure change. Because we’re not at totality yet the photos I took of the sun required the use of the solar filter. Remember that during totality the solar filter comes off!!!!
I started at 1/160 of a second during this test sequence. The sequence increased the shutter time by one stop for a total of nine photos, eventually reaching 1.6 seconds of exposure. You can see the results in the image below. I dropped the 9th photo of the sun as it was really overexposed.
Bracketing is really not too difficult. No matter which bracketing technique you’re going to use, manual or autobracketing, be sure to practice with your equipment well before eclipse day. Come eclipse day you should be able to do your bracketing during totality with your eyes closed. Of course don’t close your eyes. Otherwise you’ll miss a potentially once in a life time event!
© Willard Sharp