The 2017 Perseid meteor is currently underway and will peak on August 12 into the early morning hours of August 13th. During the peak of the event up to 80 meteors per hour are possible. However, this year the moon will make viewing more difficult. On the peak night the moon will be ¾ full and will rise at 11:12PM. This is around the time the meteor shower will get going. So with the moon light the dimmer meteors will be washed out. The brighter meteors will be visible and we should see around 40 to 50 an hour.
The nights leading up to the peak display as well as nights following the peak will also produce meteors, so if you miss out on the peak you still have opportunities to catch the show. But the number of meteors before and after the peak will be less. By August 24 the Perseid meteor shower will be over.

Composite shot of the Perseid meteor shower in Western Iowa August 2016.
The Perseid’s is a yearly meteor shower that takes place each August. The shower is caused by the Earth moving through the debris field of the comet Swift-Tuttle. Each year the Earth passes through the dust and debris the comet leaves, creating the annual Perseid meteor shower. When you sit back to watch a meteor shower, you’re actually seeing the pieces of comet debris heat up as they enter the atmosphere and burn up in a bright burst of light, streaking a vivid path across the sky as they travel at 37 miles (59 km) per second. When they’re in space, the pieces of debris are called “meteoroids,” but when they reach Earth’s atmosphere, they’re designated as “meteors.” If a piece makes it all the way down to Earth without burning up, it graduates to “meteorite.” Most of the meteors in the Perseids are much too small for that; they’re about the size of a grain of sand.
Where to Look
The Perseid’s originate from the constellation Perseus which is located in the northeastern sky. The origin of the meteor shower is called the radiant. Typically meteors from the radiant are quick and sometimes dim so what I usually do is look 30 to 45 degrees on either side of the radiant and 30 to 50 degrees above the horizon to catch those meteors that last longer in the sky. It is important to note, however, that meteors from this shower can be seen in ANY part of the sky. I’ve personally seen some bright meteors in the south and southwest sky 180 degrees from the radiant. So my best advice to you is to find a nice dark location far away from city lights, pull up a chair or blanket, and enjoy the show.
You Need Dark Skies
We can’t do much to adjust the brightness of the moon but you will improve your odds of seeing the meteor shower greatly by moving as far away from light pollution as possible. To help find those dark skies I visit the web site lightpollutionmap.info. It’s an awesome site that shows light pollution levels all around the world and it will help guide you towards the dark sky’s needed for optimal viewing.
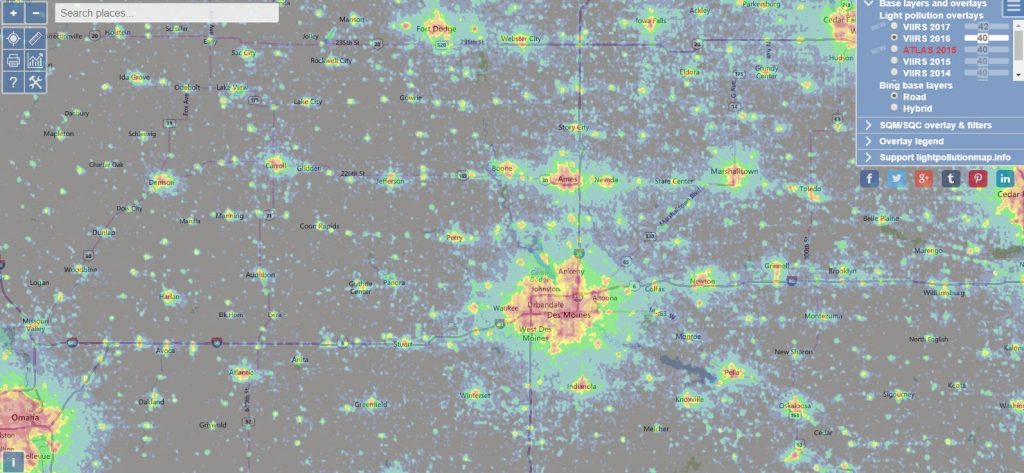
The orange and red colors on the map show where light pollution is highest. You won’t see much in the way of meteors in these areas. The green to blue to grey areas will yield darker skies most optimal for viewing the meteor shower. You’ll want to head to these areas for best viewing as the skies will be nice and dark. A grey area on the map will be best as that will lead you to the darkest skies.
Check the Weather Forecast Before Heading Out
Be sure to check the weather forecast before heading out to view or photograph the meteors. Clouds will restrict viewing and if you have a completely cloudy sky or rain then you’re out of luck until the skies clear up. If the skies are clear to partly cloudy but you have haze or fog you can still see meteors but you may miss some of the dimmer ones. If you’re planning on photographing the show you’ll need clear to partly cloudy skies. Less than 50% cloud cover is best. Lower humidity will result in crisper photos as you’ll have less haze in the sky. But if it’s humid and hazy don’t give up. You can still capture some interesting photos of the show. Check your local National Weather Service forecast for the expected weather in your area.
What you Need to Photograph the Perseid Meteor Shower
If you plan on photographing the Perseid’s you’ll need the following equipment.
- A camera that is capable of shooting long exposures and settings that can be set in manual mode.
- A wide angle lens. The wider the better. I generally use a 14mm lens.
- Fast aperture. An aperture of f/1.4 to f/2.8 is best. This allows the most light into the camera. If you don’t have a lens that is this fast then you can go up to f/4 and still get good results, but you’ll need to increase the ISO.
- Sturdy tripod
- If your lens has vibration control turn it OFF while the camera is mounted on the tripod.
- Intervalomenter, remote trigger, or interval timer on the camera for continuous shooting. There are many options for these devices ranging from a few busks too many hundreds. I have a middle of the road devises for each of these and they work great. My Nikon D750 has a built in interval timer so I setup the camera on the tripod, adjust my settings and let the program run.
How to Capture a Perseid
The camera settings for capturing a meteor shower are very similar to what I use for Milky Way photography. If I’m in a dark area I’ll use the following settings:
- Exposure 15 to 30 seconds depending on the focal length of the lens.
- Aperture f/1.4 to f/4. I tend to hang around f/1.4 to f/1.8 in the dark areas. If you can’t open to f/1.4 to f./1.8 then open the lens as wide as possible. Anything above f/4 and you’ll likely miss meteors.
- ISO 1600 to 3200. You can go higher just be aware of noise at the higher ISO. I run at 1600 to 2000 for most of my work.
- Set your white balance to 3500 to 4100. Do some test shots to see how it looks. You can adjust white balance in post processing.
If you have some light pollution issues use the following settings on the camera:
- Exposure 15 to 20 seconds depending on the focal length of the lens.
- Aperture f/2 to f/4. You may need to do some trial and error to find the optimal setting. Stay closer to f/2 if possible and if your lens is capable.
- ISO 800 to 2000. You’ll want to experiment here to see what the best setting is.
- Set your white balance to 2900 to 3400. Do some test shots to see how it looks. You can adjust white balance in post processing.
Focus
Focus is key when taking good crisp shots of the night sky. You’ll want to set your focus to infinity but remember that what is marked as infinity on your lens may not be infinity! To ensure proper focus use your LCD screen and live view to focus on a star or distant light on the horizon. Turn your focus dial until you have a sharp image on the star or light you’re using. If you move your camera or change the focal length then you’ll need to refocus again.
Shutter Speed
Since the Earth rotates, objects in the night sky will move. You need to be aware of this because if you shoot with a shutter speed that is to long then your stars will start to trail. The amount of trailing depends on the amount of time the shutter is open and the focal length of your lens. Many photographers who shot the night sky use the 500 rule to calculate the amount of time the shutter should be open to avoid star trailing. To calculate the exposure time value use this formula.
500 / (focal length x crop factor of your camera) = maximum exposure time
Full frame sensors have a crop factor of 1. DX and other crop sensor cameras have a crop factor of 1.5 or 1.6. Please refer to information from your camera manufacture to determine this number. Many times I use a 24mm f/1.4 full frame lens on my Nikon D750 camera when shooting the night sky. Using the 500 rule my exposure time calculates to this value for this lens.
500 / (24 x 1.0) = 20.83 seconds – I round down to 20 seconds in this example.
Composition
When looking for a spot to shoot the meteor shower from look for something interesting to have in the foreground. This will make your project look a lot more interesting. Consider taking a flashlight along and do some light painting of the foreground. Have something in the foreground, middle ground, and the sky will be the background. Be sure to keep the horizon last least 1/3 of the way up in your photo. Maybe even a little less. Plan on spending at least a couple of hours outside shooting as you will not get a meteor in each photo more than likely.
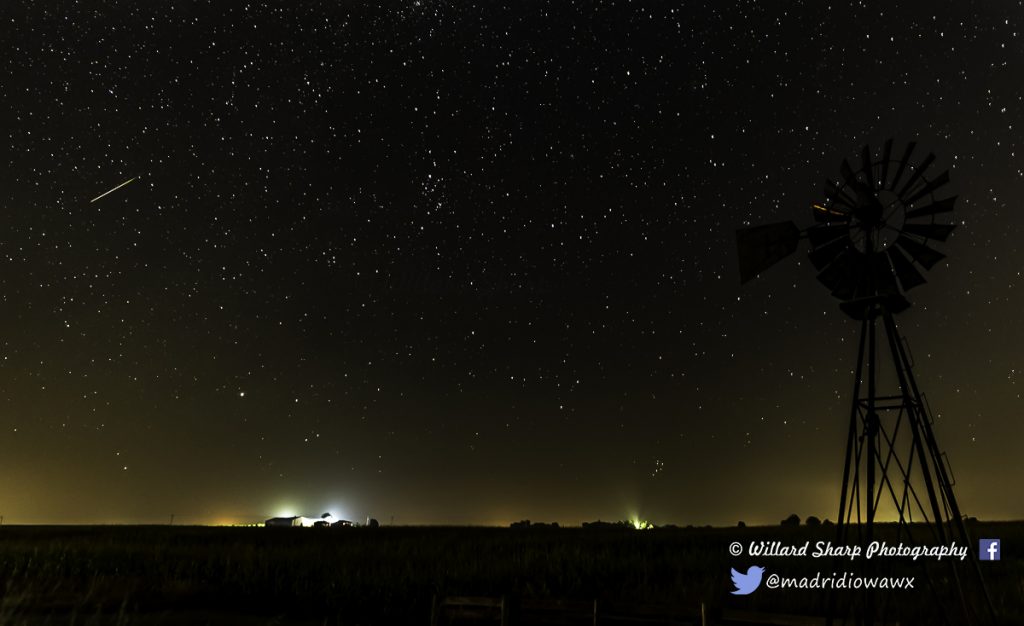
Perseid meteor and windmill north of Boone, IA on 8/9/2016 24mm, f/2, 15 seconds, ISO 1250.
Once your all setup sit back and enjoy the show!
© Willard Sharp